COMPUTER ART: INTEGRATION
Fall 2024
Rendering Animations
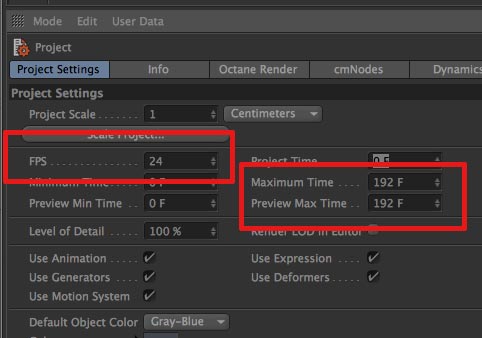
1. Make sure the Project Settings (Edit->Project Settings) are set to 24fps and check the project duration:
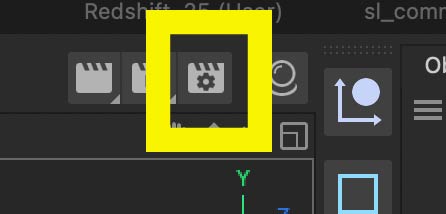
2. Go to the Render Settings:
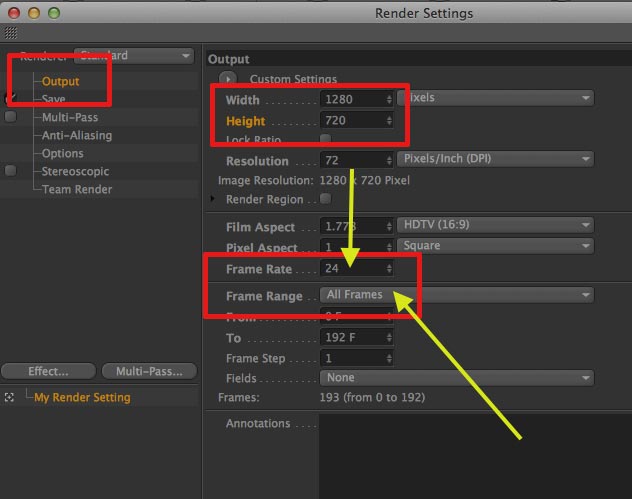
3. Set the Output size, frame rate (fps), and frame range:
4. Set the Redshift render quality to Medium. (If you are very crunched for time, Low can be used.)
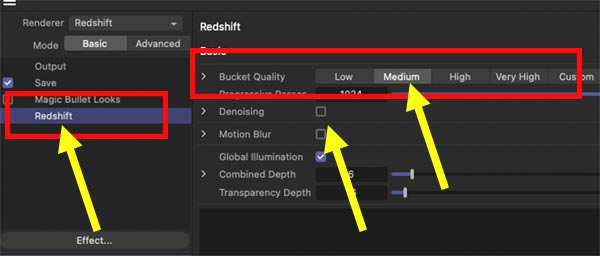
If the renders are very noisy (which is rare but can happen with lots of transparency or soft lighting), turn on Desnoising.
5. Set the Save Settings - set the save name/location, use a PNG sequence (preferred - be sure to save into a folder!):
OR save a MOV (acceptable on a single computer - save preset to ProRes422) - MP4 files are suitable for preview renders only:
* When setting the "save" location/name, be sure to use the Documents folder (if in the lab). It is recommended that you never save projects to the Desktop (and definitely do not save to the Desktop in the labs). Do not save directly to a server as the server could get disconnected and the render will stop.
* Be sure all of your texture paths are correct. The easiest way to do this is to File->Save With Assets. All of your picture files will be copied to a folder for you (called "tex" in the new project folder). Always do a quick test before setting the final render to check for texture errors. You can also use the Texture Manager (under the Window menu) to check for missing textures.
*** Be sure to keep the computer awake using one of the "keep awake" utilities. (The computer studios automatically use Amphetamine; room 65/73/75 should not be used for long rendering.)
*** If rendering a PNG sequence... when in After Effects, rt-click on the imported sequence and check "Interpet Footage." Be sure the FPS matches what was rendered from Cinema4D (should be 24fps).
Setting up Team Render
In C4D...
1. Configure all of the usual render settings (listed above).
2. When setting the "save" location/name, only put the name of the resulting file (i.e. "Ball").
DO NOT set a save location (i.e. "Users/Student/Desktop/Ball").
BE SURE TO SAVE THE ANIMATION AS A PNG SEQUENCE.
3. Be sure all of your texture paths are correct. The easiest way to do this is to File->Save With Assets. All of your picture files will be copied to a folder for you (called "tex" in the new project folder).
4. Do not render LONG sequences. Up to about 300 frames is fine but long sequences slow down over time. Break up longer sequences into multiple jobs (for example, render frames 0-300, 301-600, and 601-720, instead of 0-720). [And if you want to make your postproduction easier, break it up at every camera cut set in the Stage object... it makes editing in After Effects easier!]
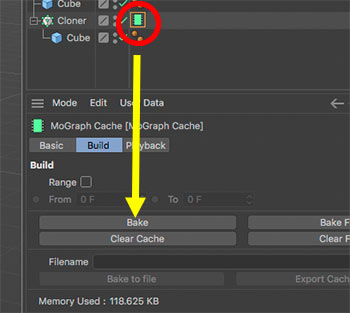
** If you are using cloners with a random effectors, you will need to cache the Cloner:
rt-click on the cloner and go to Mograph Tags -> Mograph Cache. Highlight the new cache tag next to the Cloner and in the Attributes, enable Bake Sequence (set the duration to the entire animation sequence). Then click Bake. Repeat for other Cloners.
** If simulates are used, Cache all simulations.
In Team Render...
1. Login with the class server login.
2. Go to Jobs and create a new job. Put your name in the job title (i.e. "Ball1_larson"). Jobs without names will be stopped by Larson.


3. Click on the job after it is created and upload your files. Upload the C4D file and all texture files. If you did the "save with assets" in the previous step, all pictures will be in a "tex" folder. Do not try to upload folders - everything is uploaded at the same "level".


4.
"Start" your job. It should be added to the queue.

5. Monitor your job for errors. If textures are missing, your render will stop with an "error." Click the job log to see the error and fix it (usually, you missed a picture file). Restart the job.
6. When finished, click the job, ZIP the results, and download the finished ZIP
file.
** DO NOT stop renders or change the order of the render queue without the permission of students ahead of you in the queue! **
When in After Effects, import the PNGs as a sequence (select one PNG and make sure the "sequence" box is checked). It will behave like a movie file. If it plays too fast (30fps), highlight the PNG in the After Effects bin and do:
File->Interpret Footage->Main
...switch the frame rate to 24fps.
Please remove jobs after you have completed the render and downloaded the results. Delete jobs one at a time - there is a bug that causes an immediate crash of the server if multiple jobs are deleted at once.
If Team Render saves your animation as b3d files...
If Team Render saves your animation as b3d files, do NOT re-render. Download the sequence normally (prepare a ZIP)... it will be a big download but still faster than re-rendering.
You must use Cinema4D to convert the files:
1. From within Cinema4D, open up the Picture Viewer (Window menu).
2. From the Picture Viewer, open the first image from the rendered sequence.
3. A dialog should prompt you about it being an animation and you can set the frame rate at that time.
4. Once open in Picture Viewer, you can use the Picture Viewer "Save" to convert the sequence to PNG format.
For faster and more consistent Team Rendering...
Team Render will use as many computers as are available. If you want to ensure your render goes faster, launch TeamRenderClient on any available computers, especially in room 67.
MORE COMPUTERS = FASTER RENDERS FOR EVERYONE.
If students get in the habit of launching the render client (even if you do not happen to be rendering at the moment), everyone's renders will finish quickly.
DO NOT RUN TEAM RENDER AND CINEMA 4D SIMULTANEOUSLY!
It causes consistent crashes and/or render glitches (incorrect frames, lost lights, watermarks, etc.).
DO NOT RENDER LARGE JOBS. Break large jobs into multiple smaller jobs.
300 is a good benchmark. Jobs with a large amount of frames cause problems due to memory. They also take much longer to "prepare." Shorter is better so break the project into chunks like frames 0-300; 301-600; 601-900. (400+ may cause a problem; 900+ causes problems fairly consistently; 1400+ is almost guaranteed to be a glitch-fest)